Lecture 5: Cascading Style Sheets (CSS) Fundamentals
HTML gives a web page its structure and content, but on its own it looks plain — black text on a white background, default fonts, no colour. CSS (Cascading Style Sheets) is the language that controls how HTML looks: colours, fonts, spacing, layout, and more. In this lecture you will learn the core building blocks of CSS and how to attach it to your HTML pages.
In This Lecture
- How CSS syntax works, and the three ways to attach CSS to HTML
- Why external style sheets are the preferred approach
- The main kinds of selectors: element, class, id, attribute, grouping, and descendant
- Pseudo-classes and pseudo-elements
- How the cascade, specificity, and inheritance decide which styles "win"
- The most common colour, font, text, and background properties
What Is CSS?
CSS stands for Cascading Style Sheets. It is a style sheet language — a language whose only job is to describe how HTML elements should be displayed. HTML says "this is a heading" or "this is a paragraph"; CSS says "make headings blue and 32 pixels tall" or "give paragraphs some space below them."
CSS was designed to separate content (HTML) from presentation (CSS). This separation is useful because:
- You can change the entire look of a site by editing one CSS file, without touching any HTML.
- The same HTML can be restyled for print, for mobile screens, or for accessibility tools, just by swapping the CSS.
- Multiple pages can share one style sheet, so your site looks consistent everywhere.
CSS Syntax
A CSS rule (also called a rule set) has two parts: a selector, which says which
HTML elements the rule applies to, and a declaration block, wrapped in curly braces
{ }, which says what style to apply.
Each line inside the braces is a declaration, made of a property (the aspect of the
style you want to change, like color or font-size) and a value (what you want that
property to be). A declaration always ends with a semicolon ;.
Here is a real example:
This rule selects every <p> element and sets its text colour to dark slate gray and its
font size to 16 pixels.
Comments in CSS
You can write comments in CSS using /* ... */. Anything between the slash-star pair
is ignored by the browser. Comments are useful for explaining why you wrote a rule a
certain way.
Three Ways to Add CSS to HTML
There are three places CSS can live: directly on an element (inline), inside the HTML page itself (internal), or in a separate file (external).
1. Inline Styles
An inline style is written directly inside an HTML tag, using the style attribute.
It applies only to that one element.
Rendered in a browser:

Inline styles are quick, but they mix content and presentation back together, and you would
have to repeat the same style attribute on every element you want styled the same way.
Because of this, inline styles are only recommended for quick tests or for styles generated
dynamically by JavaScript.
2. Internal Style Sheets
An internal style sheet is written inside a <style> element, placed in the <head>
of an HTML document. It applies to the whole page.
<!DOCTYPE html>
<html lang="en">
<head>
  <meta charset="UTF-8">
  <title>My Page</title>
  <style>
    body {
      font-family: Arial, sans-serif;
    }
    h1 {
      color: navy;
    }
  </style>
</head>
<body>
  <h1>Welcome</h1>
</body>
</html>
Rendered in a browser, only the <body> content shows, styled by the rules in <head>:

Internal style sheets are better than inline styles because the rules are written once and
apply to every matching element on the page. But the CSS is still stuck inside that one
HTML file — if you have a five-page site, you would have to copy the <style> block into
every page and keep them all in sync by hand.
3. External Style Sheets
An external style sheet is a separate .css file, linked into an HTML page using a
<link> element inside <head>.
This produces the exact same rendered page as the internal style sheet example above — the same navy "Welcome" heading in Arial — just loaded from a separate file instead of being written inline in the HTML.
Why external style sheets are preferred
External style sheets are the recommended approach for real projects, for several reasons:
- One file, many pages. Every page on your site can link to the same
styles.css, so your whole site looks consistent, and you only edit one file to restyle it. - Separation of concerns. HTML files stay focused on content and structure; the CSS file stays focused on appearance. This makes both easier to read and maintain.
- Caching. Browsers can download
styles.cssonce and reuse it for every page on the site, which makes your site load faster after the first visit. - Teamwork. A designer can work on the CSS file while a developer works on the HTML, without stepping on each other's work.
Selectors
A selector is the part of a CSS rule that chooses which HTML elements to style. CSS offers many kinds of selectors; here are the ones you will use constantly.
Element (Type) Selector
Selects every element of a given tag name.
This applies to every <p> element on the page.
Class Selector
An HTML element can have a class attribute, which is just a label you choose. The class
selector starts with a dot . followed by the class name.
Rendered in a browser:

Classes are reusable — you can put class="highlight" on as many elements as you like, and
you can also give one element more than one class, separated by spaces:
class="highlight bordered".
ID Selector
An HTML element can have an id attribute, which must be unique — no two elements on
the same page should share an id. The id selector starts with a hash #.
Rendered in a browser:
Class vs. id
Use a class when a style might apply to more than one element (most of the time). Use an id only for something that truly appears once on the page, such as a single page header or a unique widget. Overusing ids makes CSS harder to reuse.
Attribute Selector
Selects elements based on the presence or value of an HTML attribute, written in square brackets.
/* Any input with a type attribute equal to "email" */
input[type="email"] {
  border: 1px solid gray;
}

/* Any element that has a "target" attribute, regardless of its value */
a[target] {
  color: purple;
}
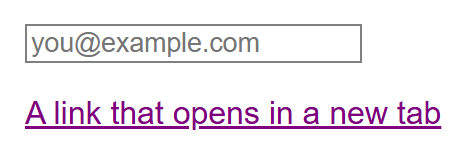
Here is one of each, rendered together — an email input with the gray border, and a link
carrying a target attribute in purple:
Grouping Selector
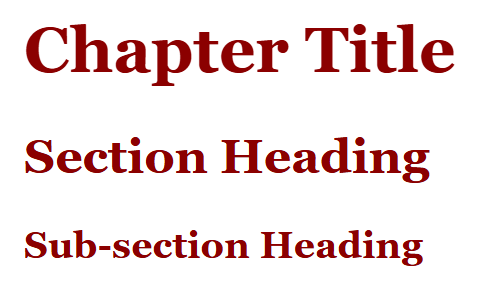
If several selectors should get the same styles, separate them with commas instead of repeating the declaration block.
This is equivalent to writing three separate rules with identical declarations, but much shorter. Rendered against three real headings:
Descendant Selector
Selects an element that is nested inside another element, no matter how deep. Write the ancestor selector, then a space, then the descendant selector.
This selects every <p> that is anywhere inside an <article> element — but it will not
select a <p> that lives outside any <article>.
<article>
  <p>This paragraph IS styled (it's inside article).</p>
</article>
<p>This paragraph is NOT styled (it's outside article).</p>
Rendered together, so the contrast is visible in one image — the first paragraph (inside
<article>) picks up the darker #333 from the descendant rule, while the second
paragraph (outside <article>) is left at the browser's default black:

Pseudo-Classes and Pseudo-Elements
Pseudo-Classes
A pseudo-class selects an element based on a state or condition, rather than
something written in the HTML. Pseudo-classes start with a single colon :.
a:hover {
  text-decoration: underline;
}

button:disabled {
  opacity: 0.5;
}

li:first-child {
  font-weight: bold;
}
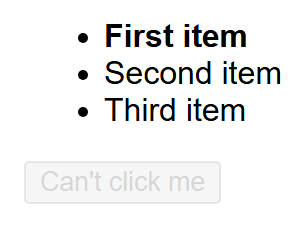
:hover and :active need a live mouse to demonstrate and can't be captured in a static
screenshot, but :first-child and :disabled are states the browser can render up front.
Here is a list where the first <li> picks up the bold rule, next to a button styled with
button:disabled { opacity: 0.5; }:
Common pseudo-classes include:
| Pseudo-class | Matches |
|---|---|
:hover |
When the mouse pointer is over the element |
:focus |
When the element (like a form field) is focused |
:active |
While the element is being clicked |
:first-child |
An element that is the first child of its parent |
:last-child |
An element that is the last child of its parent |
:nth-child(n) |
The *n*th child of its parent |
:not(selector) |
Elements that do not match the given selector |
Pseudo-Elements
A pseudo-element lets you style a specific part of an element, such as its first
line, or lets you insert generated content before or after it. Pseudo-elements start with
a double colon :: (older code sometimes uses a single colon for these too, which browsers
still accept for backward compatibility).
p::first-line {
  font-weight: bold;
}

.quote::before {
  content: "“";
}

.quote::after {
  content: "”";
}
Rendered in a browser — a paragraph long enough to wrap, with only its first rendered
line bolded by ::first-line, and a quote wrapped in curly quotation marks that were
never typed into the HTML, only generated by ::before/::after:
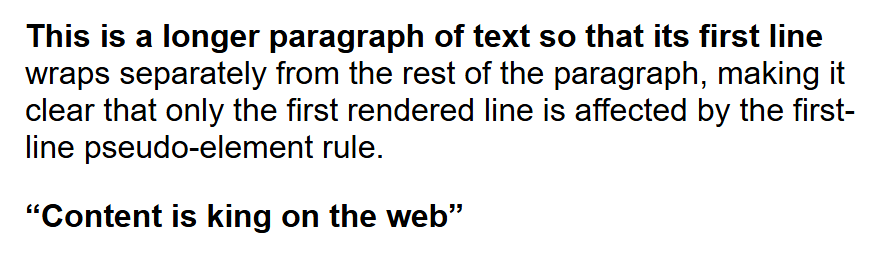
::before and ::after are especially common: they insert content that is not in the
HTML at all, purely for decoration (like the quotation marks above).
The Cascade, Specificity, and Inheritance
CSS stands for Cascading Style Sheets for a reason: when more than one rule could apply to the same element, the browser needs a way to decide which one wins. This decision process is called the cascade, and it depends on three things, in order:
- Importance — a declaration marked
!importantbeats a normal one (use this rarely). - Specificity — a more specific selector beats a less specific one.
- Source order — if two rules are equally specific, the one that appears later in the CSS wins.
Specificity
Specificity is a score CSS gives to every selector, based on what kind of selectors it is made of. Roughly, from lowest to highest:
| Selector type | Example | Specificity weight |
|---|---|---|
| Element / pseudo-element | p, ::before |
Lowest |
| Class / attribute / pseudo-class | .highlight, [type="text"], :hover |
Medium |
| ID | #main-header |
High |
| Inline style | style="..." |
Higher than any selector |
!important |
color: red !important; |
Overrides everything else |
When two rules target the same element, the browser adds up the specificity of each selector and applies the winning rule's declarations.
p { color: black; }          /* specificity: low  */
.intro { color: green; }     /* specificity: medium */
#lead-paragraph { color: blue; } /* specificity: high */
Rendered in a browser:

Here the paragraph will be blue, because the id selector has the highest specificity, regardless of the order the rules were written in.
Inheritance
Some CSS properties inherit — meaning a child element automatically takes on the
computed value from its parent, unless you override it. Text-related properties like
color, font-family, and font-size inherit by default. Layout-related properties like
margin, padding, border, and width do not inherit — each element gets its own
default for those.
Because color and font-family inherit, every element inside <body> — every paragraph,
heading, and list item — will use that same colour and font unless a more specific rule
overrides it.
flowchart TD
    A["Which rule wins?"] --> B{"Is one marked !important?"}
    B -- Yes --> W1["!important rule wins"]
    B -- No --> C{"Compare specificity<br/>(inline > id > class > element)"}
    C -- "Higher specificity" --> W2["More specific rule wins"]
    C -- "Equal specificity" --> D["Rule that appears LATER<br/>in the CSS wins"]
Colour, Font, Text, and Background Properties
Colour Values
CSS colours can be written in several formats:
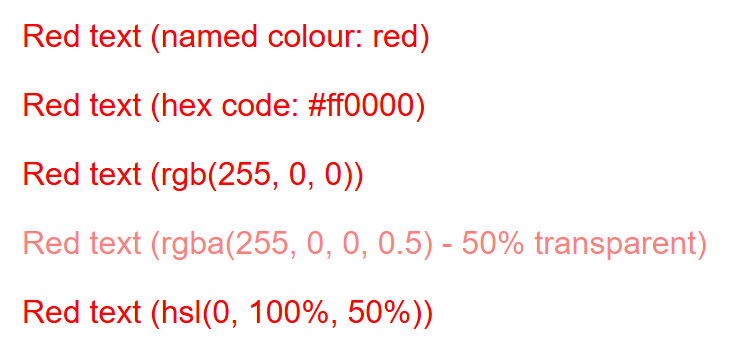
.a { color: red; }                 /* named colour */
.b { color: #ff0000; }             /* hex code */
.c { color: rgb(255, 0, 0); }      /* red, green, blue (0-255 each) */
.d { color: rgba(255, 0, 0, 0.5); }/* rgb + alpha (transparency, 0-1) */
.e { color: hsl(0, 100%, 50%); }   /* hue, saturation, lightness */
All five rendered together — the first three (named, hex, and rgb) all produce the exact
same solid red; the fourth is visibly lighter/pink because its 0.5 alpha blends the red
with the white page background; the fifth (hsl) is solid red again:
color sets the text colour. background-color sets the background colour of an element's
box.
Font Properties
p {
  font-family: "Helvetica Neue", Arial, sans-serif;
  font-size: 16px;
  font-weight: bold;   /* or a number like 400, 700 */
  font-style: italic;
}
Rendered in a browser:

font-familyis a fallback list: the browser tries each font in order and uses the first one it has available. Always end the list with a generic family likesans-serif,serif, ormonospace, so there is always something to fall back on.font-sizecan be in pixels (px), or relative units likeemandrem(multiples of the parent's or root's font size).font-weightcontrols boldness (normal,bold, or a number from 100–900).font-stylecontrols slanting (normal,italic).
There is also a shorthand property, font, that combines several of these into one line:
This shorthand produces the same bold-italic rendering as the four separate declarations shown above, just written on one line.
Text Properties
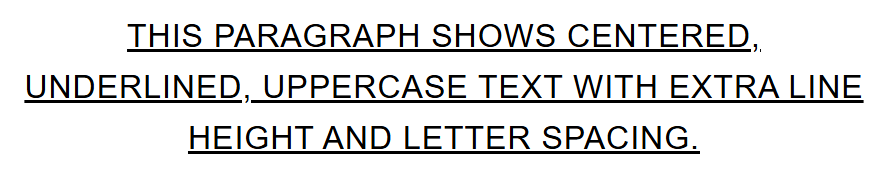
p {
  text-align: center;       /* left, right, center, justify */
  text-decoration: underline; /* none, underline, line-through */
  text-transform: uppercase;  /* none, uppercase, lowercase, capitalize */
  line-height: 1.6;           /* space between lines of text */
  letter-spacing: 0.5px;      /* space between characters */
}
Rendered in a browser:
Background Properties
.card {
  background-color: #f5f5f5;
  background-image: url("pattern.png");
  background-repeat: no-repeat;
  background-position: center;
  background-size: cover;
}
background-colorfills the element's box with a solid colour.background-imageplaces an image behind the element's content.background-repeatcontrols whether the image tiles (repeat,no-repeat,repeat-x,repeat-y).background-positioncontrols where the image sits within the box.background-sizecontrols how the image is scaled (coverfills the box,containfits the whole image inside it).
Like font, there is a background shorthand that combines several of these properties
into one declaration.
Try It Yourself
- Create an HTML file with a heading, three paragraphs (one with
class="note"), and a link. Create an external file calledstyles.cssand link it from your HTML. Instyles.css, style the heading's colour and font, give.notea light background colour, and make the link change colour on:hover. - In the same file, add a
<div id="banner">above your heading. Write three competing rules for its text colour: one using the element selectordiv, one using a class you add to it, and one using its#bannerid — each a different colour. Predict which colour will actually show, then check your answer in a browser and explain why, using what you learned about specificity.
Key Takeaways
- CSS controls the presentation of HTML: colour, fonts, spacing, and more, while HTML stays focused on structure and content.
- CSS can be added inline, internally in a
<style>tag, or externally in a linked.cssfile — external style sheets are preferred because they keep styling consistent, cacheable, and separate from content. - Selectors decide what gets styled: element, class (
.name), id (#name), attribute ([attr=value]), grouping (a, b), and descendant (a b) selectors are the essentials. - Pseudo-classes (
:hover,:focus) target element states; pseudo-elements (::before,::after) target parts of an element or insert generated content. - When multiple rules could apply, the cascade resolves the conflict using importance, then specificity (id > class > element), then source order.
- Some properties, mostly text-related ones like
colorandfont-family, inherit from parent to child automatically; box-related properties generally do not.